How To Use Uniprint
Stevens Institute of Technology has a printing system called Uniprint, developed by Pharos Systems. It works with the Stevens Campus Card system for accounting and authentication. Use of this system requires students to have a valid Stevens Identification (ID) Card to obtain their printouts. Your Stevens ID Card provides a convenient alternative to cash. Activation is free, plus there is no fees or dues. In order to use your Stevens ID Card with Uniprint, all you have to do is deposit money into your Duckbills account then use your card to pay for your printouts, as needed.
Using the Stevens ID Card
- You automatically have an account if you have a valid Stevens ID Card. No account sign up is required.
- There is no membership fees or service charges.
- You can add value to your account using cash or with a Visa and MasterCard credit card.
-
Safe - If you accidentally lose your Campus ID card, REPORT IT AS LOST (see below). Your money is secure and you can immediately print again once you have your new replacement card.
-
Easy to use - It is easy and fast to add value to your card online and view the balance, 24 hours and 7 days a week.
-
Convenient - You can use it for printed output and at the copy machines in the Library.
Note: Before you start printing, please make sure the Uniprint software and printers are installed. The Uniprint software is available for Mac OS and Windows. Please see the appropriate section of this guide for your OS.
Where To Print
Pharos Uniprint printers are located at SC Williams Library.
Costs
Uniprint Printing Prices
Black and White
Color
Single Sided
$0.04 per page
$0.40 per page
Duplex
$0.03 per side
$0.39 per side
Depositing Money into Your Account
Online
Step 1: Log into https://my.stevens.edu.
Step 2: Click on DuckCard Office (Duckbills) icon.
Step 3: Select Deposit Funds from the available options.
Step 4: Enter the Credit Card information and the amount of money you want to add.
Note: We only accept Visa or Master Card.
Cash
Step1: Go to the Value Transfer Station (VTS) located in the Library on the first floor next to the Library's scanner stations.
Step 2: Add Cash to the VTS. The VTS machine accepts cash only.
Stevens Debit Account
Funds may also be deposited into your Stevens Debit Account by a third party without you providing them with your password. All they need to know is your Stevens Campus Identification number and full name. This is useful if you would like to have your parents deposit funds. Anyone with access to the Internet can go to https://stevens-sp.transactcampus.com/eaccounts and follow the Stevens Debit Non-Cardholder Instructions and links.
Check Your Account Balance
- You can check your balance online OR
- In person at the Value Transfer Station (VTS) which is located in the Library on the first floor next to the Library's two copiers.
Report a Lost Card
Terms and Conditions
The participant understands and agrees that:
- The Stevens Debit Account is not transferable.
- No interest or other earnings will be paid to the holder or credited by Stevens Institute of Technology.
- Full refunds are only permitted upon graduation, academic withdrawal, or employment termination from the University. Partial cash withdrawals are not permitted.
- Stevens Institute of Technology reserves the right to close accounts that remain inactive for a period of twelve (12 months) or when students withdraw, terminate enrollment, or graduate.
- Stevens Institute of Technology is not responsible for any loss of funds in your Stevens Debit Account due to lost or stolen cards. We strongly recommend that the cardholder maintain a small balance and add value when needed.
- Value additions are usually instantaneous but sometimes may be delayed by network traffic.
Retrieving Your Document From the Print Queue
Step 1: Bring your valid Stevens ID Card, which should have Duckbills available to use in your Debit Account, to the printer that you submitted the job to. Print jobs sent to the Library Print Queue can be accessed from any of the Library printers.
Step 2: Use the card reader to swipe your Stevens ID and access the print queue.
Step 3: Scroll through the document list and select your print job.
Step 4: Touch the Password box to enable the onscreen keyboard. Enter the password you used to submit your job, then hit OK.
Step 5: Note the cost and hit the Print button when ready. Your document will print and the charge will automatically be deducted to your Duckbills account. If you have insufficient funds, you will not be able to print.
Step 6: If you do not wish to print the job, you may delete it instead by following the same instructions above, then hit the Delete button instead of the print button.
Step 7: Once you have printed your document, be sure to log out so others do not print from your account. To do this, hit the Sign Out button.
Installing the Uniprint Printers
Windows
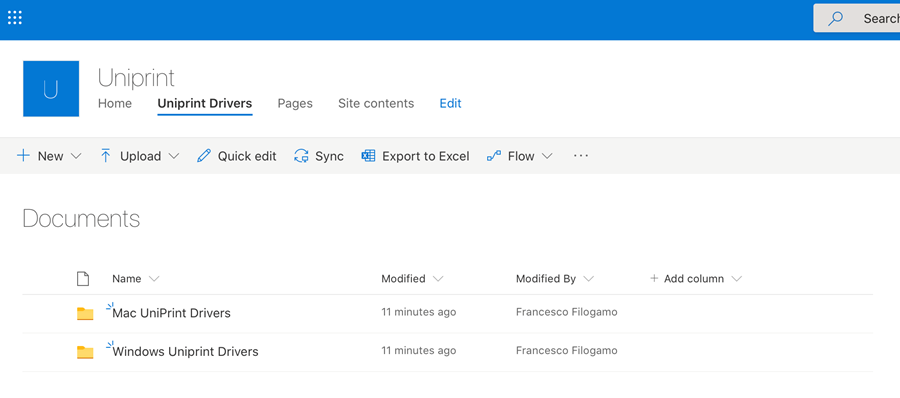
Step 1: Go to https://stevens0.sharepoint.com/sites/Uniprint.

Step 2: Navigate to the Uniprint Drivers tab.

Step 3: Open the Windows Uniprint Drivers folder by double-clicking it.
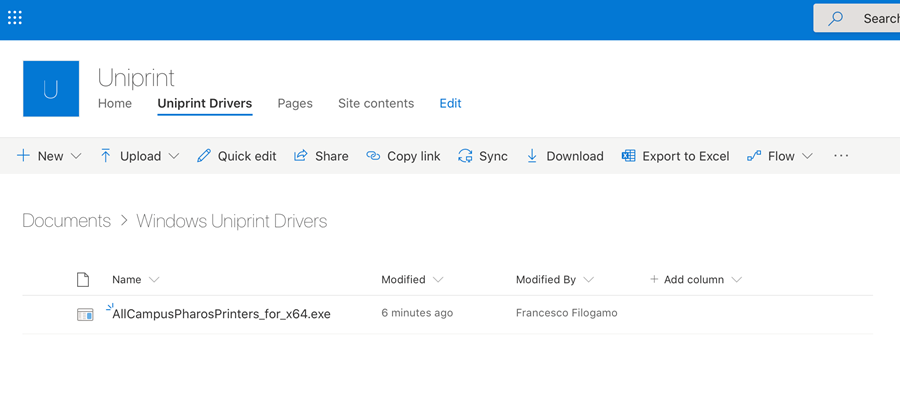
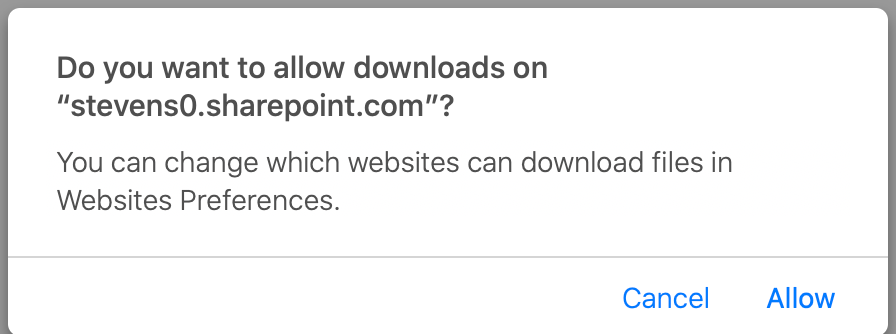
Step 4: Click on AllCampusPharosPrinters_for_x64.exe If you see a message asking you to allow the download, select Allow.
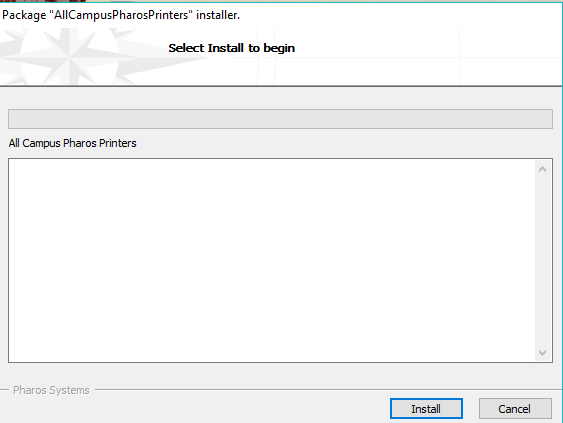
Step 5: Navigate to your Downloads folder and click on AllCampusPharosPrinters to run the software. Select Install and select Finished when done.
Step 6: Select a Print Job.
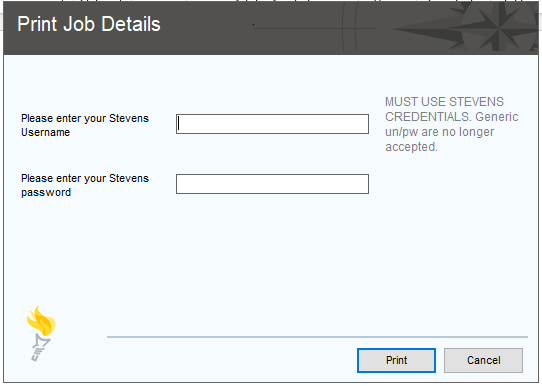
- When you are ready to print a document, select Library_Print_Queue_for_Windows and hit Print.
- You will be prompted to enter your Stevens username and password.
Note: The username and password must be your Stevens credentials. Generic credentials are no longer accepted. If you mistype your Stevens credentials, you will not receive an error message, and the job will not show in your queue. You will need to resubmit the print job.
- Hit Print, then retrieve the job from the printer you selected using your ID card.
Mac OS
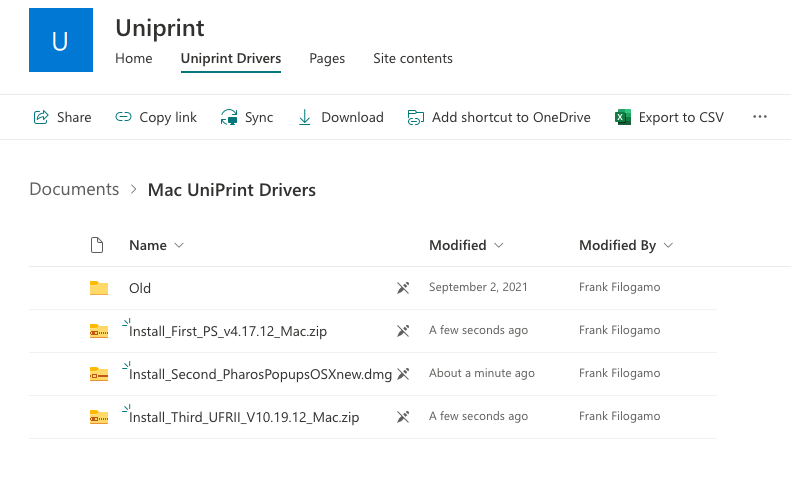
Step 1: Go to https://stevens0.sharepoint.com/sites/Uniprint.
Step 2: Navigate to the Uniprint Drivers tab and open the Mac Uniprint Drivers folder by double-clicking it.
Step 3: Select Install_First_PS_v4 17.12_Mac.zip, Install_Second_PharosPopupsOSXnew.dmg, and Install_Third_UFRII_V10.19.12_Mac.zip and then click Download on the toolbar.
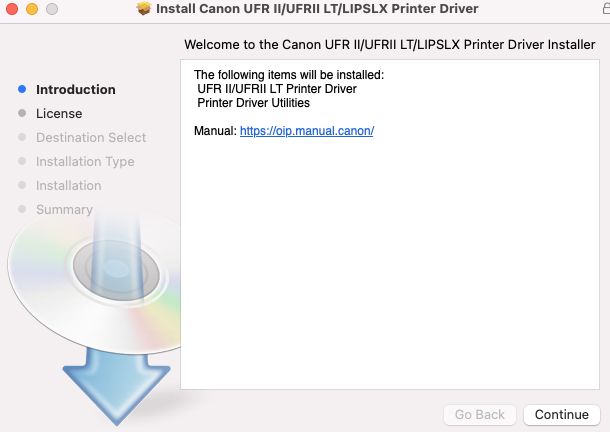
Step 4: Navigate to your Downloads folder and double-click Install_First_PS_v4 17.12_Mac.zip. This will run the installer, select Continue.
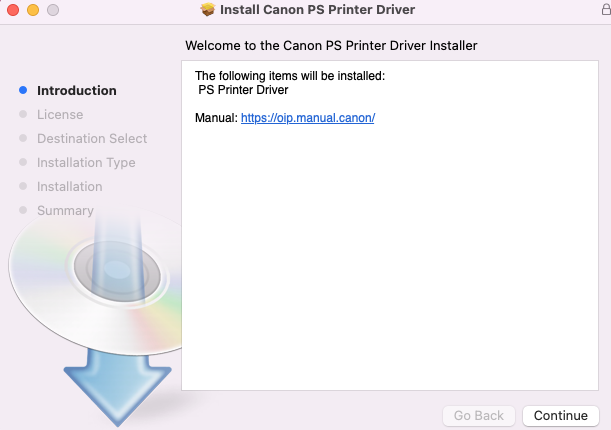
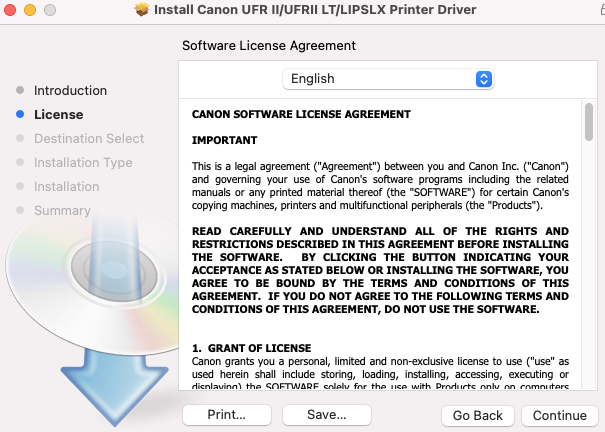
Step 5: Read the Canon Software License Agreement, then select Continue.
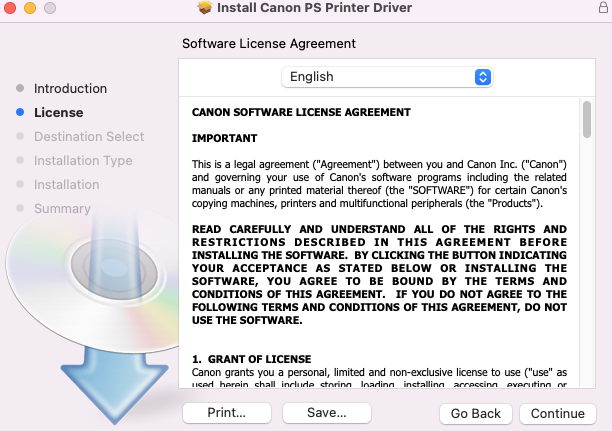
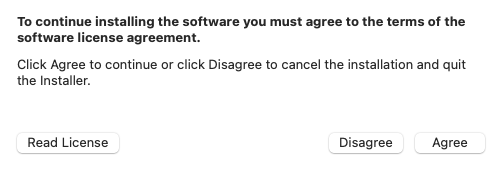
Step 6: A pop up will appear asking you to agree to the terms of the license agreement; select Agree.

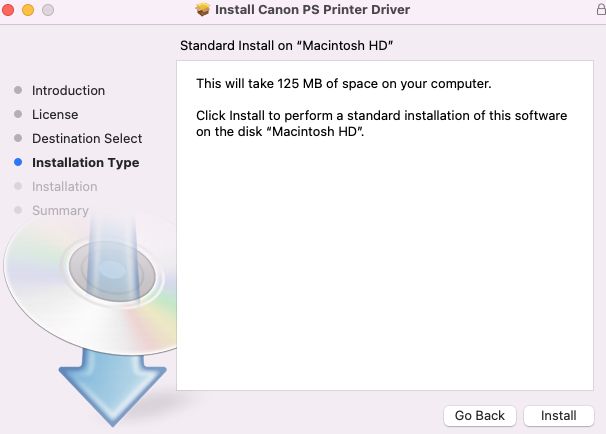
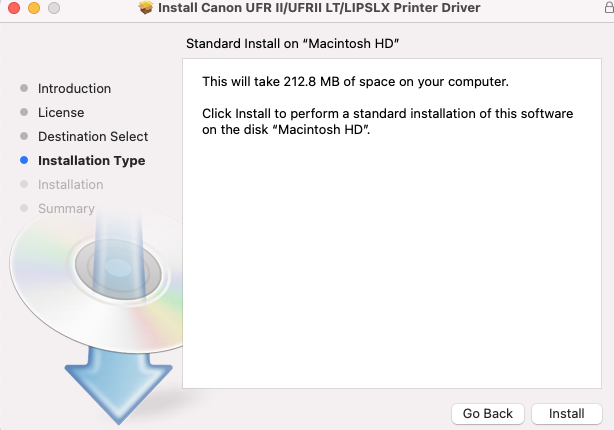
Step 7: Select Install.
Step 8: The Installer pop up will appear stating that it is trying to install new software. Enter the credentials you use to log in to your machine and select Install Software.

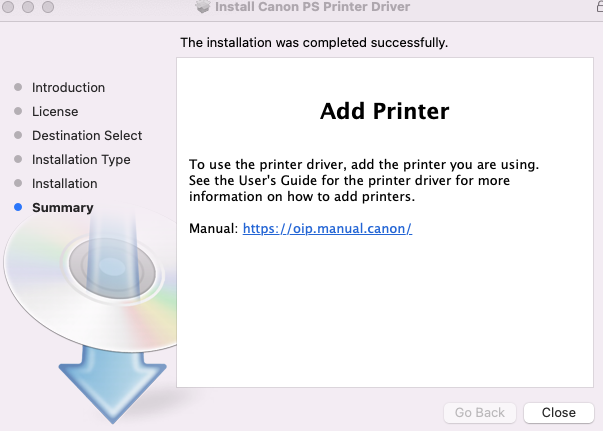
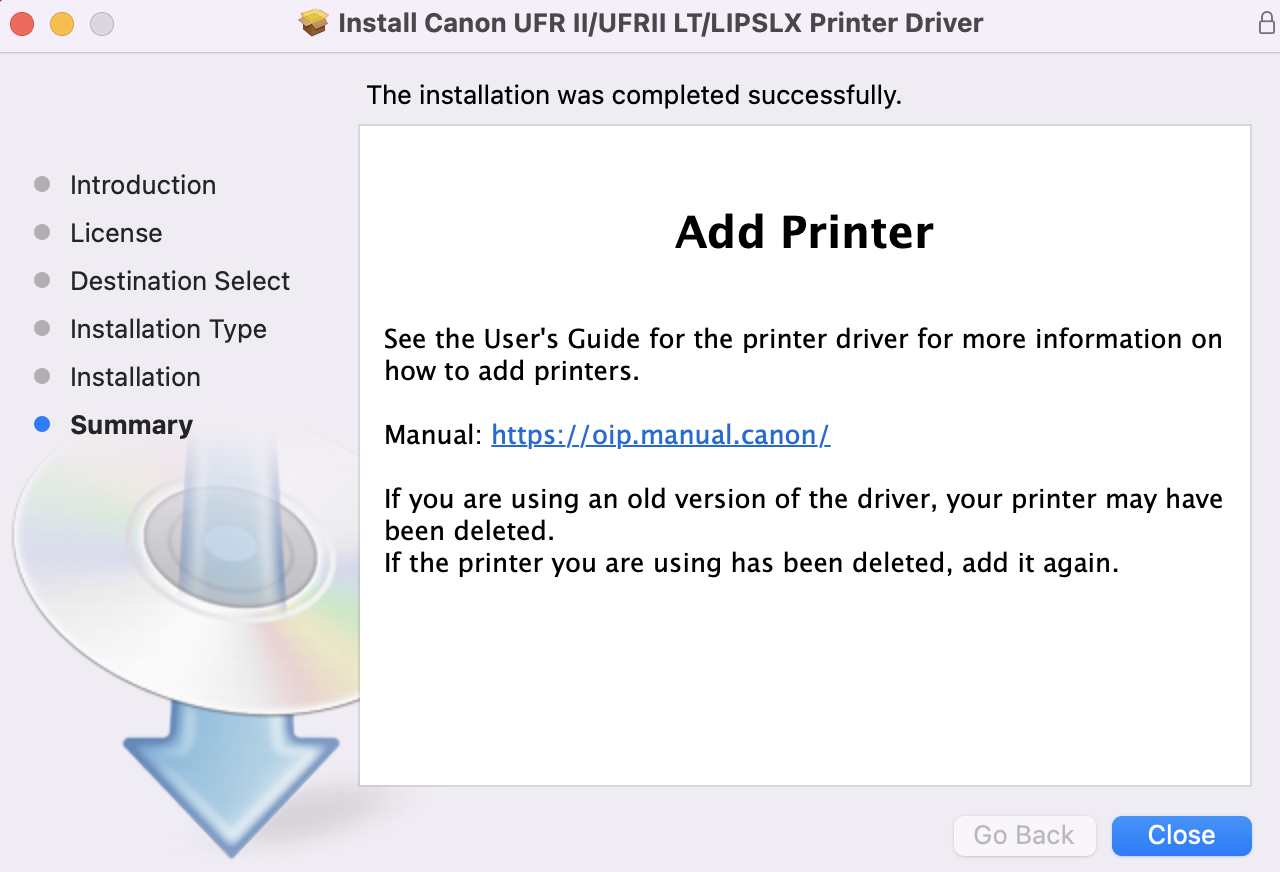
Step 9: The installation was completed successfully; you do not need to Add Printer. Select Close.
Step 10: Navigate to your Downloads folder and double-click Install_Second_PharosPopupsOSXnew.dmg. This will run the installer, select Continue.
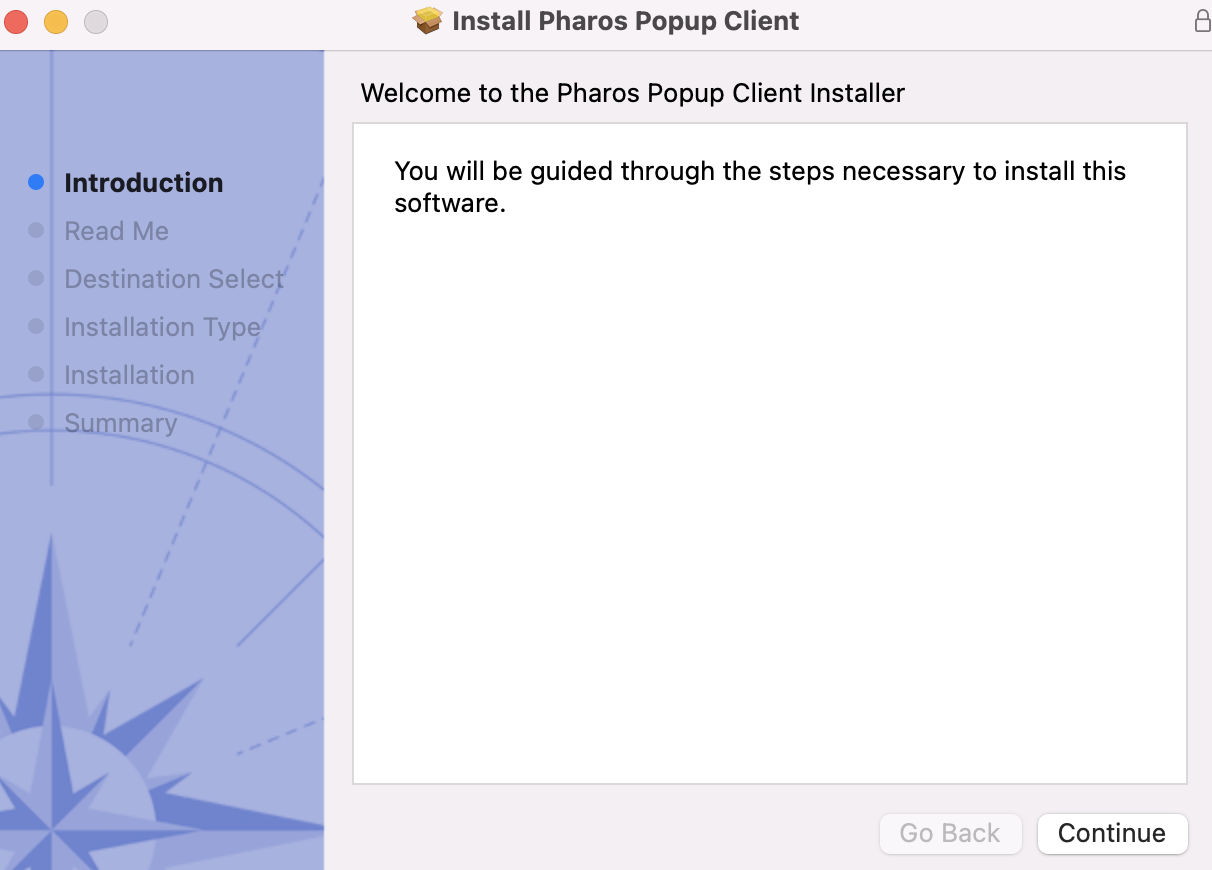
Step 11: Select Continue.
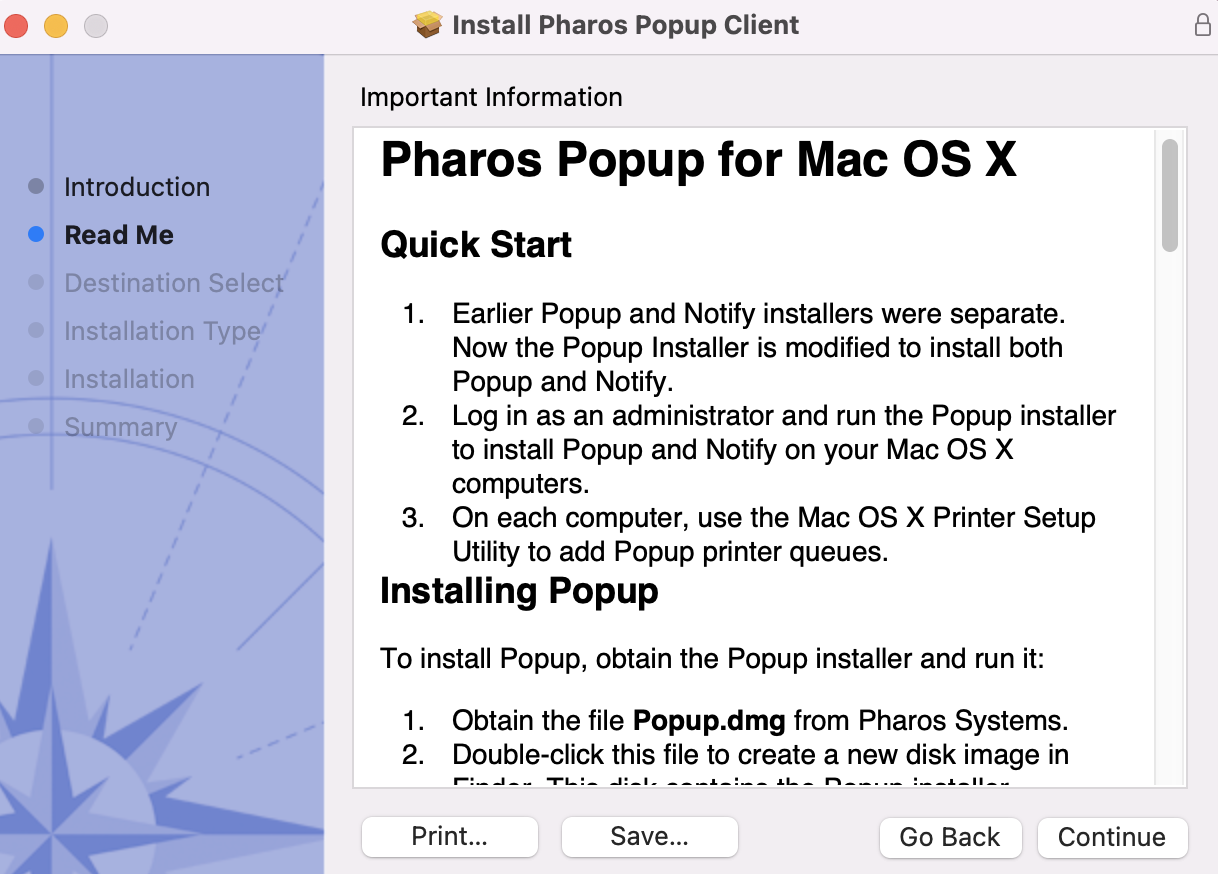
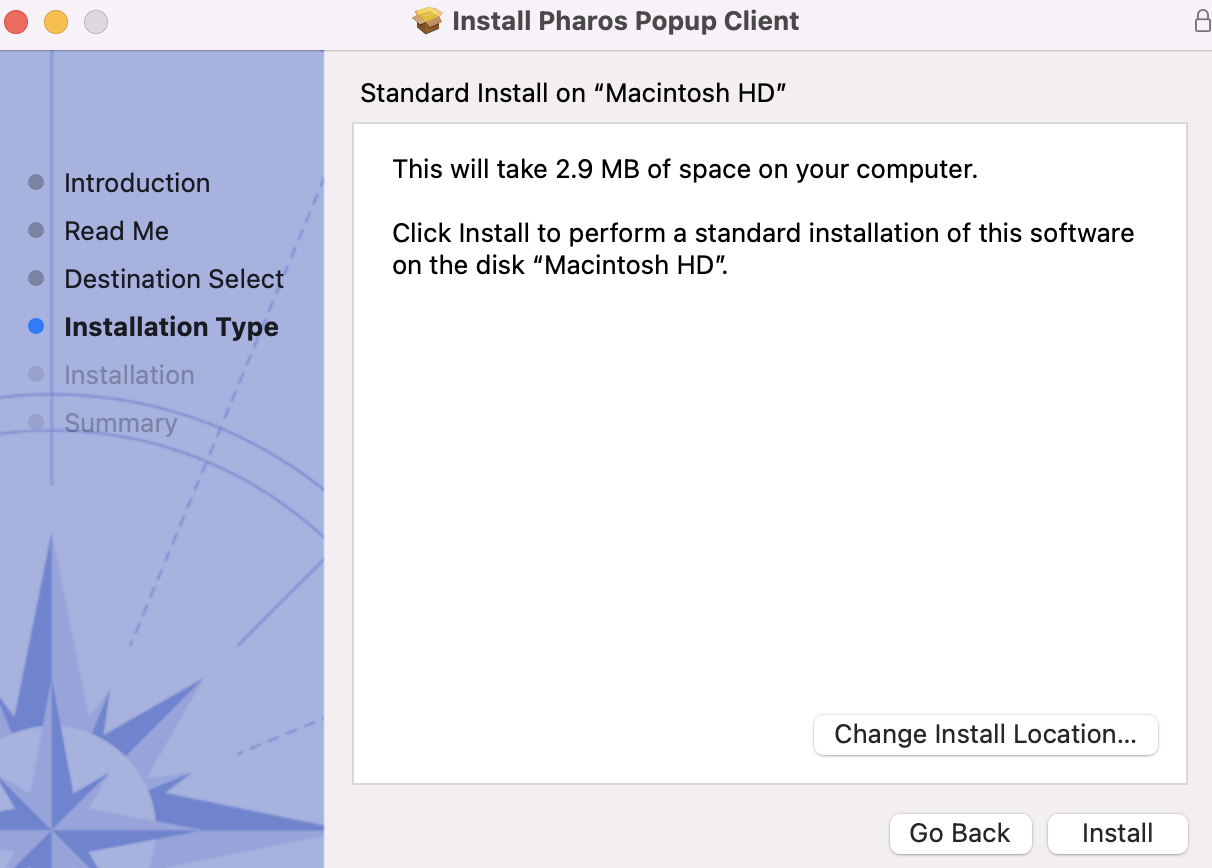
Step 12: Select Install.
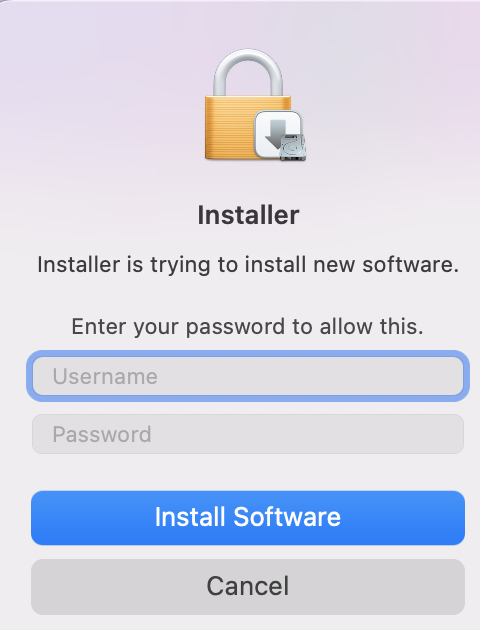
Step 13: The Installer pop up will appear stating that it is trying to install new software. Enter the credentials you use to log in to your machine and select Install Software.
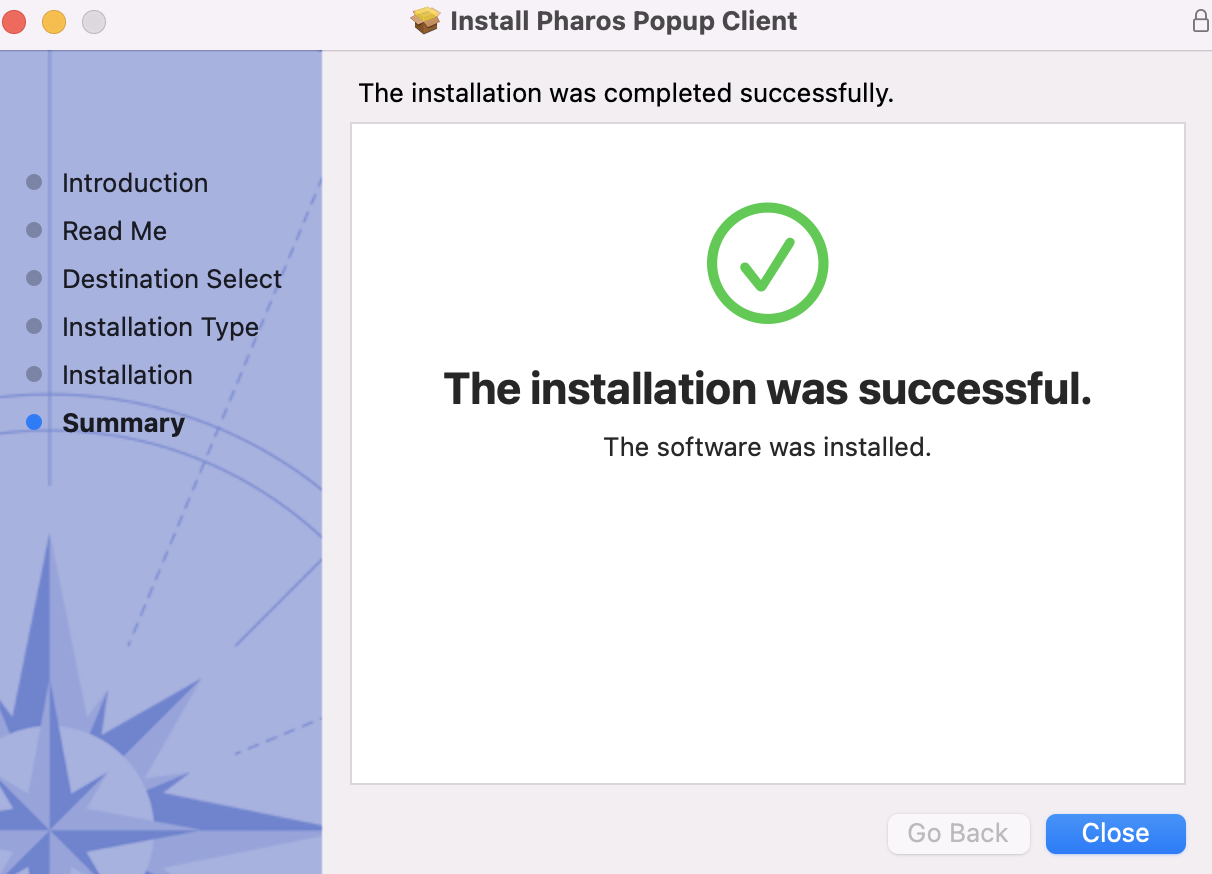
Step 14: The installation was successful, select Close.
Step 15: Navigate to your Downloads folder and double-click Install_Third_UFRII_V10.19.12_Mac.zip. This will run the installer, select Continue.
Step 16: Read the Canon Software License Agreement, and then select Continue.
Step 17: A pop up will appear asking you to agree to the terms of the license agreement then select Agree.
Step 18: Select Install.
Step 19: The Installer pop up will appear stating that it is trying to install new software. Enter the credentials you use to log in to your machine and select Install Software.

Step 20: The installation was completed successfully; you do not need to Add Printer. Select Close.
Step 21: Send a Print Job.
- When you are ready to print a document, select Library_Print_Queue_for_OSX and hit Print.
-
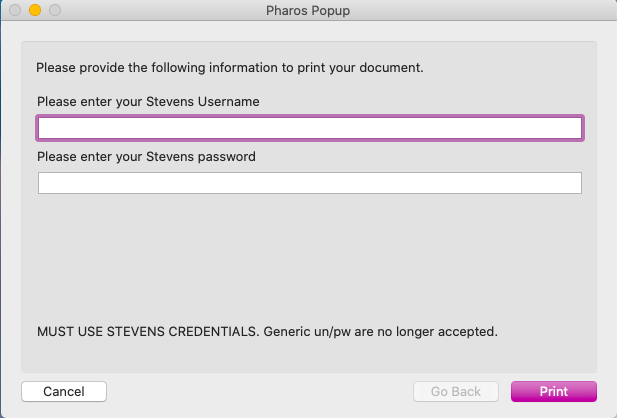
You will be prompted to enter your Stevens username and password.
Note: The username and password must be your Stevens credentials. Generic credentials are no longer accepted. If you mistype your Stevens credentials, you will not receive an error message, and the job will not show in your queue. You will need to resubmit the print job.
- Hit Print, then retrieve the job from the printer you selected using your ID card.
Printing Options
Printing in Color and Black and White
Note: The Canon Printers print in color by default. Follow these steps to change this option.
Step 1: Click the Printer Properties button.
Step 2: Go to the Color tab.
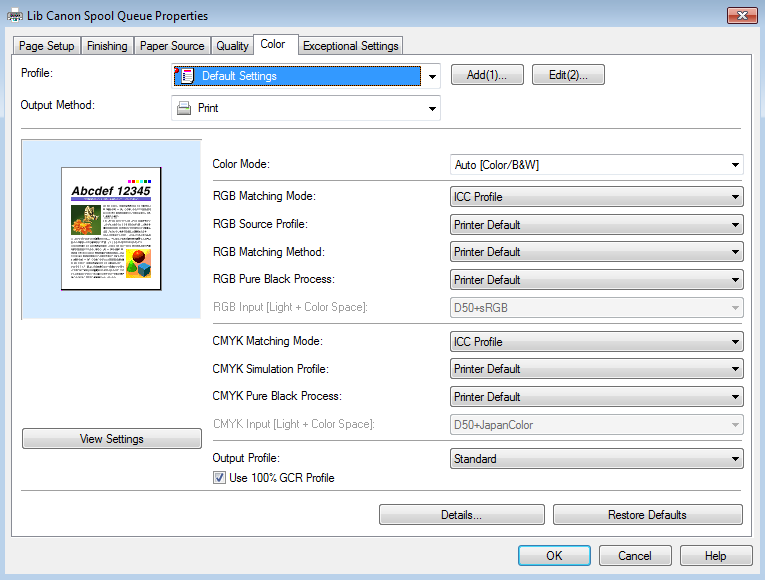
Step 3: Make sure the drop down next to Color Mode is set to Black and White. Click OK.
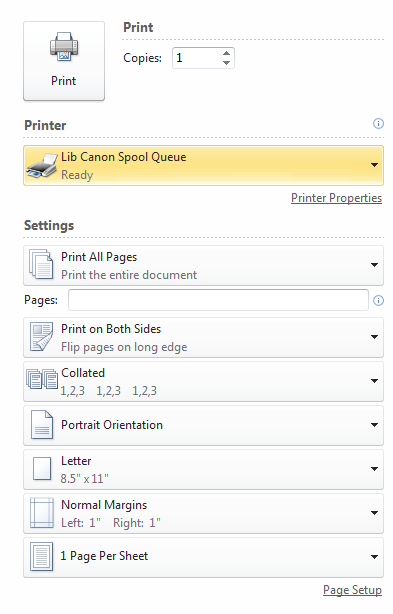
Printing On Both Sides (Duplexing)
Step 1: Click the Printer Properties button.
Step 2: On the Finishing tab, select the 2-Sided Printing option from the Print Style drop down.
Step 3: Select Yes, flip over. Your document will now print on both sides of the paper.
Experiencing an issue or need additional support? Contact our OneIT Team by